24.08.2017 by Infogram
Creating an awesome infographic takes time and effort. You need to find an idea, identify your audience, collect data, pick which type of infographic you want to design, customize it, tweak it, and finally publish or download the finished product. Now what?
Creating the best infographic on the web is only half the battle. You need to share it! Effectively promoting and distributing your infographic is the best chance you have to get more traffic and possibly go viral. There are multiple ways to get your infographic in front of a diverse audience. You spent hours making a polished infographic, now it’s time to get noticed. Here are a few proven ways to share your infographic online:
Gather Your Assets
Before you start promoting your infographic, make sure you have everything you need. You should be prepared to share various file formats and embed code to ensure your infographic can be viewed almost anywhere.
File Formats – If you’re downloading an image of your infographic, try and save as many file types as possible. These formats generally include JPEG, PNG, and PDF files. JPEGs are lower resolution, so they are great for quickly sharing and viewing on the web. PNG and PDF are higher-quality formats, which are helpful if you want to share a higher-resolution image.
Infographic Snapshots – Download pieces of your infographic, or take screenshots of specific sections to include on social media, in blog posts, and in press releases. This will give you a visual edge and make viewers want to see more.
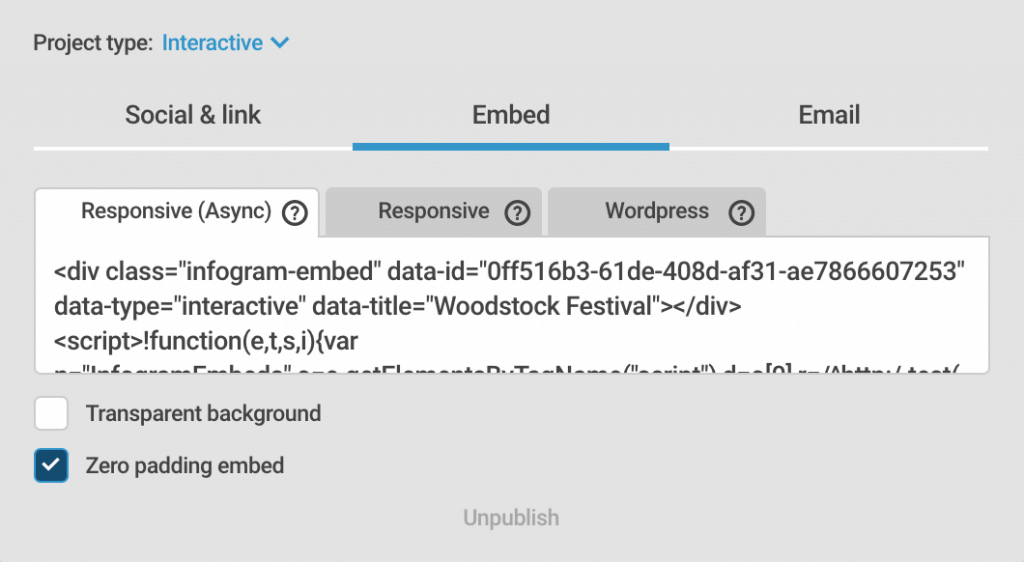
Embed Code – Embed codes let you embed your infographic on websites and blog posts. They also make it easy for visitors to embed your infographic on their sites. (Bonus!) Infogram gives you an embed code to copy and paste when you publish an infographic on our site, but you can also use this embed code generator.
Be a Content Marketer
You don’t have to be a content wiz to promote your infographic like one. These 5 simple tips will have you sharing your infographic like a professional marketer.
1) Write a blog post. This is the easiest way to give your infographic a home online. Use a few simple SEO tricks to make sure your post is easy to find by search engines. We suggest you include your topic and the word ‘infographic’ in your headline, write a small summary paragraph, and embed or upload your full image.
2) Email your infographic to contacts you’ve made and relevant influencers you know. Ask your network to embed it on their site or share it on social media. This is a win-win: you offer them free quality content and you get more reach with minimal effort.
3) Send out an email newsletter. Emails with visuals get more attention than text-only messages. This is where a small teaser snapshot of your infographic comes in handy. With a little creativity, your email newsletter can get way more interesting and super clickable.
4) Write a press release. Write a catchy headline, share some stats, explain who you are, and offer pre-written social posts ready to simply copy and paste. If you aren’t sure where to send your press release, check out PRWeb, PR Newswire, and PRLeap.
5) Deconstruct your infographic into multiple images that you can turn into a short video or presentation. You can promote videos on YouTube, or other video hosting sites, and presentation tools like Prezi make it easy to animate your infographic for optimal engagement.
Social Media Plan
After you’ve published your infographic online, you need to create a strategic social media sharing plan. Use the link to the blog post you’ve created, pick a few related hashtags, and choose a few stats or facts you find to be the most impressive, or the most shareable.
6) Enable social sharing buttons so viewers can easily post your infographic to their Facebook pages, Twitter accounts, or Pinterest Boards. You want to make it as simple as possible for people to pass on your infographic.
7) Schedule a roll-out of Twitter, LinkedIn, Facebook, and Google+ posts, along with plans for Pinterest, Flickr, and Tumblr – if these platforms suit your brand. Don’t be afraid to share more than once! Don’t assume the first wave of people who see your infographic will automatically share it. If you want the chance to have your graphic go viral, we suggest you start the early momentum yourself.
#Infographic: What kind of back-to-school content are kids viewing most on YouTube? https://t.co/cIQ9HtB5GS pic.twitter.com/6GIrNkKG0W
— Michael Chase (@chasethisnow) August 22, 2017
Social Tip: Go ahead and use the cropped snapshots of your infographic to get people curious about your work. Pick a fact or two featured in your infographic that you think people will find interesting and tease it out, one section at a time. Infographics tend to get a little long – the last thing you want to do is share the entire infographic on social, leaving people frustrated because they can’t read or properly view your content.
Would you like to experience the full power of data visualization? Try Infogram for Teams or Enterprise for free! With a Team or Enterprise account, you can create up to 10,000+ projects, collaborate with your team in real-time, use our engagement analytics feature, and more. Request your free demo here.
Submit Your Infographic
There are so many amazing directories, blog, groups, and social media accounts that focus on infographics, and more importantly, they love to share them! This is the quickest way to get your infographic in front of people who already love what you do.
8) Submit your infographic to directories and blogs like the ones listed below. These sites get a lot of traffic, which can help your project gain traction.
- Cool Infographics
- Daily Infographic
- Visually
- Mashable Infographics
- Reddit Infographics
- Submit Infographics
- Infographics Showcase
- Infographic Bee
- Infographic Journal
9) Search for influencers and social media accounts related to the topic you covered. Once you’ve found the authority on your subject, introduce yourself and share your infographic. Here is a list of 17 data visualization influencers to get you started.
Do you have a nice infographic you want to share? We want to see it. Reach out to Infogram on Twitter or Facebook to show us your work. If we love it, you might get featured on our blog or social channels! You can also read about 5 helpful rules for presenting data like a pro.
Get data visualization tips every week:
New features, special offers, and exciting news about the world of data visualization.